ladbon

There was one and there was no one

Month: December, 2014

Implementation in Helium!

I’ll give you guys a rerun on whats happened so far.
The class was given a 3D engine from the teacher to create a 3D game.

Most of the engine is already written such as the camera, scene management and all of their functions capable of creating a passing grade result.

The lectures we’ve been having before this was working on a shell of the engine just implementing the camera, scene, background, triangles, squares, 3D objects, height maps and HUD.

Thing is, with this new version nothing looks the same and now we have to connect it all and make sure it looks professional.

And if somebody haven’t been reading I am the average Joe. It feels like a chimpanzee understanding how to work a Swiss knife.

So my first challenge was to concentrate on getting a state up and running from where I can place the objects in. From here I can declare,  initialize, draw and update my objects.

My first problem was to understand that all the states inherit from the abstract_game class which basically is the engine. The engine class is just like any class, it initialize everything and connect most of the engine classes to the game specific classes.

So problem one solved.

After that I had to make sure the state manager has my state, attaches it and then use it as the first one.

We now have everything up and running!

Now we need to initialize all the objects and the engine systems in order to construct, draw and update the stuff we create !

I’ll leave you guys here I am afraid. Most of the time have been spent looking at the mountain of information, observing and planning my approach. I am not going to even talk about the amount of help I got(shout out for my class mates <3).

Good night all and I’ll see you guys after Christmas. Cheers.


Icing

So web servers have to wait a while. I’ve been making more progress on another assignment.

This time around we have been fortunate enough to work on a 3D engine. My assignment is to make a 3D game with a partner.
The genre we picked was racing. This time around the game is not the focus instead we will be focusing more on the systems built around it.

To be honest, most of the code has already been written before in different versions and most of the underlying systems have been pre-written before we even touched this assignment which made this assignment so much easier.

So what I am going to talk about is the systems. This is to make sure I myself understand them correctly so if you guys find anything badly written please comment below =)

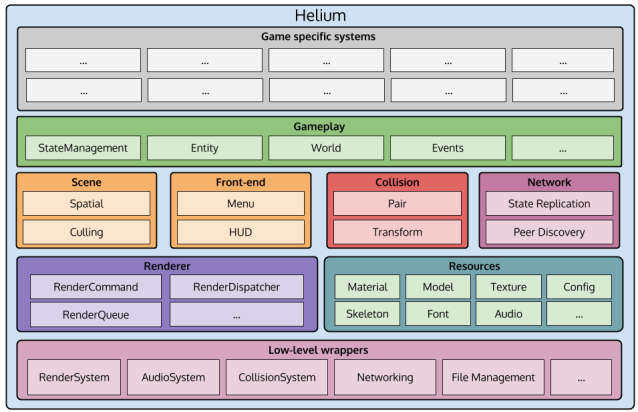
So this is the way we are writing our engine.

3DEngine

The renderer systems is all but done and given to us before the assignment. Same goes for most of the resources. The Front-End was taught and the scene as well. A state management system was also beautifully written and given to us. Most of them haven’t been connected properly though. Some are just created and not even implemented correctly though and the funny thing is we got some of the code rewritten(parameters were changed order) in order for us to NOT copy code.

A super villain couldn’t have done it better.

So, most of our lectures have been about creating a camera, a texture, shader, buffer, a triangle, square, box, height map, moving the camera(or the world!) and understanding the fundamental part of how to construct a 3D world.

Its beautifully thought out in my opinion. As I see it you create a system that’s connected to each other more advanced for my mouse brain at the moment. You start by creating a window, like opening your eyes. Then you provide them with color by giving the world a background. You then create a parameter for your eyes, now you are allowed to move your head but there is an underlying fact here. You aren’t moving the camera throughout the world you just created, you are simply moving the world while the camera is still, neat huh?

After this mind blowing fact you start by creating the easiest geometric form possible with dots or vertexes(vertices), the triangle. By combining different triangles you can create the geometric shape you need from there on out. Connecting the vertexes together to minimize the amount of dots used and now you have a beautiful three dimensional box. Add some textures, shaders and buffers and boom, its a box!

Now lets say you create tons of boxes all around your camera. What would be the easiest and most efficient way to make sure the computer isn’t working its ass off to make sure these boxes are being rendered and updated all the time? You create a scene! much like a theater a scene is everything your looking at or what the camera perspective is looking at. Most of the hidden materials are already around you, you just aren’t looking there. So when you move your scene to the left some boxes stop rendering and the others takes their on the scene!

Beautifully thought out and most efficient when you got a 2 square km area filled with objects and your in the middle of it. This is called culling and scene management.

Now I will write the rest later today on another post as I am obliged by the course to do so.
Not really much code here because I haven’t really written anything. I’ll be talking more about the other implementations at the next post and the week after will be more about my own code =)


Cheers.

Web Servers!

This blog post and probably the next one will be about winsock servers.

Winsock like many other ways to code servers is a hassle and are not worth the trouble unless you are seriously considering creating one.

This post will only outline my idea of how the server is going to be designed in a simple way to interact with a user trying to connect to the server.

I will show some code but as I am only at the accept phase I wont be going into detail from there on.

So, creating a web server!

Networking is done very close to how we communicate outside the digital era.
It needs to be initialized first with

#include

int main(int argc, char* argv[])
{
WSAData init;
WSAStartup(MAKEWORD(2, 2), &init);

you then need to create a mailbox with an address

struct sockaddr_in server_addr;

here you create a mailbox with the name of the address as “server_addr(ess).

server_addr.sin_family = AF_INET;
server_addr.sin_addr.S_un.S_addr = INADDR_ANY;
server_addr.sin_port = htons(8080);
memset(server_addr.sin_zero, 0, sizeof(server_addr.sin_zero));

here you give the title of the mailbox as an internet based one, you give the addresscode to be your IP address you pick your zipcode(port) and you

So now you have a mailbox of the internet type with your address(localIP) and your zip code(port).

Now its time to create a route for your mailman. We can this a socket, this socket will be listening on the zip code you have to see whether or not you got mail(hihi).

SOCKET listener = INVALID_SOCKET;
p_sock = socket(AF_INET, SOCK_STREAM, IPPROTO_TCP);

here we declare the socket and define it as a TCP one. This means we use the TCP protocol as the route for our mailman.

After this we give our mailman a badge, a title, a bag and a paycheck to keep working until we close down shop.

In networking terms we call this bind.

bind(p_sock, (const struct sockaddr*)&addr, sizeof(struct sockaddr_in));

here we bind the socket our address. Its like hiring a mailman for our mailbox.

listen(p_sock, SOMAXCONN);

these are his instructions, he is to see if there are any requests to send mail to us and signals us whenever that happens.

From here on out there wont be any code so I’ll just follow the metaphor for people to understand the inner workings.

So we got our mailbox with an address and a zip code, we have a mailman that goes our zip code route to see if we get any requests to send mail as well.

Now its time to wait…

we create a while loop from here on out to look for visitors. In this loop we check if our mailman ever comes back with some mail and if he does we look at the envelope to see its return address and accept it before we open the mail.

This mean we have to create a socket and an sockaddr_in and when we do get a request we use the accept method and bind the socket and sockaddr_in to the user.

while (true)
{
SOCKET ns = INVALID_SOCKET;
struct sockaddr_in remote;
int size = sizeof(struct sockaddr_in);
if (WSAWaitForMultipleEvents(1, &hacc, TRUE, 10, FALSE) == WSA_WAIT_EVENT_0)
{
std::cout << “accepterar” << std::endl;
ns = accept(listener, (sockaddr*)&remote, &size);
}
}

This is what it could look like.
When you’ve done this part you have accepted the mail and you know the return address.

You know accept connections to your server.

When this is done you now allow requests form that user so you receive anything they send in a manner you find welcoming, send the requested information and wait for them to send an acknowledgment.

This is what TCP call a three way handshake.

Now to have a good server you might want to save each user after you accept them in a list, keep their connection alive(see if they have data) and delete users whenever you haven’t gotten anything from then in a while.

When you finally close down shop you should end with this:

WSACleanup();

but you need to close down any sockets you’ve open like so:

closesocket();
Unit Testing

So this time I’ll be blogging about what Unit testing is and how I applied it to both my projects(BST and L.List).

Generally unit testing follows your functions you’ve created and makes sure they return the correct values or just does what they are suppose to do.

The way you configure them is dependent on what your functions does.

I will state here what kind of testing my class does and how it does so.

As a whole this is my unit testing:


bool are_equal(T a, T b)
{
return a == b;
}

template <class T>
bool verify(T expected, T got, const std::string& message)
{
if (are_equal(expected, got))
{
std::cout << message << “: ” << “PASSED” << std::endl;
return true;
}
std::cout << message << “Failed! Expected: ” << expected << ” Got: ” << got <<
” – ” << std::endl;
return false;
}


I send a specific value i expect to be returned from the function I check and the returned value. I also send a small message like “TESTING DELETION(): “.

So in order to lets say deletion to be checked I write the following:


//ERASE A L_LIST NODE
message = “\n\n\nTESTING ERASING INDIVIDUAL NODE AND SEARCH: “;
list.Erase_Individual_Node(data);
unit.verify(0, list.Search(5), message);

Here I send out a message, delete the individual node by using the function then use the unit testing class.
I send a ‘0’ to be expected because my function return the value 0 when it cannot find the node->value and send in the request to find the value I just deleted.
If I had failed I would have returned the data 5 which does not equal 0.


Its seriously just this easy. The code for the unit testing class was not written specifically by me, I only altered a few variables.

For more reading on unit testing:

http://en.wikipedia.org/wiki/Unit_testing
http://code.tutsplus.com/articles/the-beginners-guide-to-unit-testing-what-is-unit-testing–wp-25728
http://artofunittesting.com/definition-of-a-unit-test/